A true Tech-Priest of Mars knows that an efficient battle tank is one that can be armed according to the theater of war. One such artifact of destruction is the Space Marines Predator. Designed to harness a variety of loadouts, a Predator can be any of the following major variants:
In game terms, players may use any of these variants and a Space Marines Predator boxed set comes complete with parts to build any ONE of it. However, it will come in handy and, most especially, cheap if one Predator kit can be modeled to use these weapons interchangeably.
Materials:
My magnets (with a hopefully successful attempt at size comparison… the P3 paint bottle!)
7 pairs of small cylindrical rare-earth magnets
* mines are about 6mm thick by 4mm in diameter, and has a 2mm diameter lengthwise hole
1 GW Space Marines Predator boxed set
* or a GW Chaos Space Marines Predator boxed set
super glue
paper clip
hobby knife
jeweler’s saw
hobby file
pin vice
pliers
Pre-requisite:
Assemble the kit to come up with a regular Space Marine Rhino chassis (i.e. no sponsons and turret bits affixed to the tank yet). Glue in the sponson hoods (these are the tank’s side extensions where the sponson weapons are attached). At this point, you may also choose to glue the turret hatch (where the turret swivels on top of the tank).
Also before you glue the magnets in different parts of the tank kit, MAKE SURE that you are attaching the magnets on the corresponding poles as their pairs.
Steps for the Sponsons:
Sponson Attachments
Size of my magnet is just right to look like a sponson attachment
1. Insert the sponson attachments (that cylindrical bit that connects the chassis to the sponson weapons) on their proper slots. Also, you may already want to glue the sensor array in place.
2. Cut the lower part of the attachments (right below the partition) so that what remain are the partition itself and the upper part of the cylinder (the part lodged through the sponson hood and connected to the sensor array).
3. Level the area that you cut (underneath the partition) with a knife or a file.
4.
Glue the magnet on this area. Ideally, the magnet’s diameter should fit within the area of the partition (about 4mm in diameter max).
Diameter of my magnet fits underneath the partition
5.
Optional:
Because my magnet has a lengthwise hole, pinning it on the attachment is possible to make it sturdier. Otherwise, you can make do just to glue it outright.
Sponson Weapons
What it looks like for heavy bolter & lascannon sponsons
1.
There is a small gap on top of one half of the sponson weapon bits. Carve a similar gap on the other half of the bit so that you can assemble both halves with the magnet tucked in between and inside the hole (formed from linking the gaps). You need to measure how wide the hole should be, depending on the size of the magnet.
2. Glue the magnet inside one of the gaps, just enough for the magnet on its corresponding sponson attachment to connect with it (not too far within the bit).
3. Glue the other half of the bit. You should now have a sponson weapon with a hole on top of its casing where the magnet is.
4. Repeat steps 1 to 3 for the remaining sponson weapons.
Reminder: Be certain that the magnets are glued and fitted tightly on the holes. It will be doubly hard to do fixes later on if the magnets fall off and the top assembly is already affixed. Same goes for the turret assembly below.
What it looks like when attached
Steps for the Turret:
Turret Assembly
1.
When the top and the bottom assembly of the turret are put together, there will be two adjacent holes in the weapon slot. Carve the upper and lower gaps of the hole to fit the magnets. Again, measure how much you need to carve before proceeding with it.
Turret assembly magnets go here
2.
Once done, glue the magnets on the gap of the bottom assembly. Make sure that no part of the magnet sticks out of the hole.
3. Glue the top assembly. You should now have a turret assembly with magnets on both sides of the weapon slot.
Turret Weapons
1. Notice that underneath one end of the turret weapons, there are two hollow slots. Drill a hole on both sides of these slots, wide enough to accommodate the diameter of 2 to 3 paper clips.
2. Optional: Cut 2 to 3 sections of a paper clip, about 3mm long (long enough to lodge through the hole created above and still leave room inside the slot for the magnet to fit in).
3. Insert and glue the sections of paper clip through the hole, side by side.
4. Glue the magnet on the slots (one end touching the paper clip bits, if you pick not to skip Steps 2 and 3).
Red shows the slots for the magnets. Yellow shows where to drill for the paper clip bits.
Personally, I find the optional steps above necessary to lessen the pull between the weapon and the assembly magnets. With less pull, there’s also less effort to remove the weapon and prevent potentially ruining your paintjob in the future. But again, this is a preference thing.
What it looks like when attached
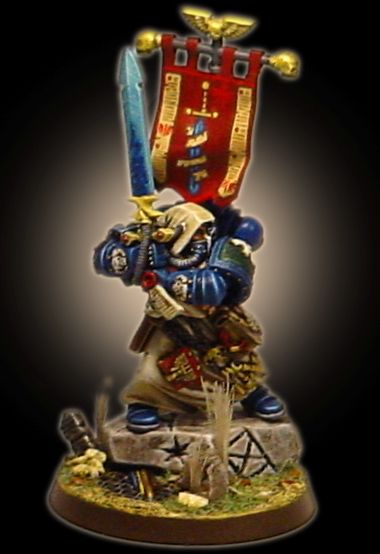
Finished product – a Dark Angels Predator with interchangeable weapons